

Home Made Easy – Braai
 |
Follow @BuildersFan |
In this week’s episode of Home Made Easy, we do what South Africans do so well… Braai! Tanya shares some of her favourite braai recipes while Ryan builds a fired wood stand and Elle overhauls an old braai.
Part 1 – Tanya’s Braai inspired recipes
Hake in Banana Leaves on the Braai

Serves 2
What you need
- 2 pieces hake
- For the marinade
- Third cup soya sauce, 3cm piece of ginger grated, 1 finely chopped chili, 2 cloves garlic, 1 tbsp white wine vinegar, 2 tbsp treacle sugar, 2 tblp olive oil, Juice of one lemon – add together and mix.
How to make it
- Press firmly on the main vein of the banana leaf to crush and soften the hard ridge.
- Place one piece of hake on the banana leaf and pour over dressing.
- Fold over the banana leaf in a pocket and pin close with a toothpick.
- Do the same to the remaining piece of hake.
- Please on grill for 5-7 min per side.
- Open and serve.
Yummy Pineapple and Mint Pudding
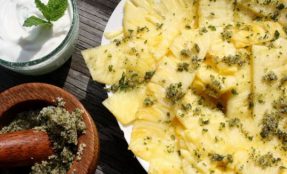
Serves 2-4
What you need
- 1 fresh pineapple, ripe
- 4 tablespoons treacle sugar – white sugar can also be used
- A handful of mint leaves
How to make it
- Core the pineapple and cut it into quarters.
- Thinly slice of bits of the quarters
- Arrange the slices on a plate in one or two layers. I tend to go for one.
- Put the sugar into a mortar and pestle and then add the mint leaves.
- Bash the heck out of the mint leaves until they no longer look like mint leaves.
- Add a blob of thick Greek Yogurt on top and serve.
Watch the video
Part 2 – Workshop (Ryan)
Braai wood stand


You will need:
| Materials | Tools |
| Wood: Pine: 20mm board and 20x40mm and 20x20mm poles | Mitre saw |
| Wood: Screws 35mm | Jig saw |
| Stain – Dark Mahogany | Cordless drill |
| Castor wheels | |
| 2x Hinges | |
| 1x Latch |
Follow these steps:
- Determine area for application of wooden log stand and cut wood to desired width and height: e.g. 400mm x 2000mm
- Width: 400mm x 400mm shelves – x4
- Height: 400mm x 2000mm uprights – x2
- Support: 400mm lengths – x8
- Mark the location of each shelf at the bottom, 2 in the middle and 1 on top.
- Secure the wood supports in place on both sides of the wooden uprights with glue and screws.
- Place each wooden shelf between the wooden uprights and secure together using glue and screws.
- OPTIONAL: Mount roller caster wheels to the base of the wooden log stand.
- Create a folding table cut out from a wooden board e.g. 400mm x 900mm
- Cut 2 wooden poles to create legs and secure together using a wooden cross-brace at the top and bottom.
- Secure the legs and table together using a hinge system, and then secure the table and legs to the upright also using a hinge system.
- Stain the project using your preferred colour and enjoy.
Watch the video
Part 3 – Workshop continued (Elle)
Braai renovation


Material List:
- Two pre-cut pine squares to fit the sides of the braai
- Wood stain (We used Mahogany)
- Power drill and 6mm wood drill bit
- *counter sinking the bolt heads into wood optional (wood filler and scraper)
- Two small off-cut pieces of wood for the lid handle & 2 medium length wood screws
- Long bolts and nuts
- A wrench & screw driver
- Gloves
- Drop sheet
- Wire brush
- Sander
- Soap & water
- Painters tape and newspaper
- Rustoleum High heat spray or paint in black and sliver
Steps:
- Lay down the drop sheet to protect the work surface. Start brushing the braai with the metal brush to take off any flakes of old paint and rust.
- Next use some sand paper and a sander (a multi sander was used) to smooth out any rough surfaces to help aid for the high heat paint to adhere in the best possible way.
- Use some detergent and water with a washcloth and clean the braai. Allow to fully dry before moving on to the next step.
- Use painter tape and newspaper to mask out any areas of the braai that you do not want painted or spray-painted. Shake the spray can for 1 min and read the instructions on the can.
- Hold the can about 15 cm away from the surface and spray in a continuous motion horizontally. Evenly spray one coat and allow to dry before applying another coat. Surface will dry to the touch in about a half hour, and will be ready to handle in 1 to 2 hours.
- When you are finished, clear the spray valve of the spray can by holding it upside down and holding down spray button for about 5 sec. Now it can be stored for use at a later stage.
Adding new wood to the sides of the braai
- Step 1: Measure out the wood pieces needed for the sides of the braai unit, and cut new wood to size.
- Step 2: Once your 2 wood pieces are cut to size, use a sander to smooth the surface of the wood.
- Step 3: Stain and seal the wood, in your preferred finish. For this project a wood stain with a built in sealant was applied with a rag.
- Step 4: Lay the wood on the sides of the braai, clamp the wood in place and from the underside use a small 4mm drill bit inserted into a drill to lighting mark where holes are to be drilled, the holes in the metal arms of the braai where too thin to use a pencil for marking.
- Step 5: Make use of a scrap wood to place under the pine timber before drilling. This helps to protect your work surface and prevents the wood from splitting on the underside. Drill holes to attach the wood to the braai and secure with nuts and bolts.
- Step 6: Replacing the wood handle on the braai lid: Mark out where drilled holes must be placed on the larger wood piece of the handle. After drilling the holes, line up the handle holes and then place a smaller piece of wood on the underside and then secure with a clamp. Carefully drive in medium screws into those holes, passing through the metal handle’s holes and biting into the second piece of wood securing the handle in place.
- Step 7: Add a hanging rack on the side of the braai and dress with braai utensils and enjoy a restored braai.
Watch the video
[/accordian]

