Re-use / Re-cycle
| Follow @BuildersFan |
In this week’s episode of Home Made Easy, we look at ways that you can re-use and re-cycle at home. Tanya shows you how to make a bug hotel, while Ryan repurposes a window frame and Elle puts wine bottles to good use…
Part 1 – Tanya
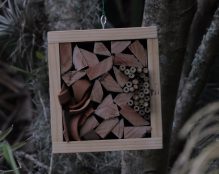
Bug hotel DIY
A bug hotel is a vital addition to any garden, as it attracts beneficial insects. You want insects in your garden as they add to a healthy ecological environment. From pollinators like bees, to aphid eating lacewings. Building your own is quick and easy!
Material:
| Materials | Tools |
| Cane / Bamboo | Scissors |
| 4 x pieces of pine | Hammer |
| Masonite backing board | Drill-driver |
| Wood screws | |
| Broken clay pots | |
| Off-cut wooden blocks | |
| 1 x I-hook to hang bug hotel from |
Steps:
- Start by building a box by attaching the four pieces of pine timber using wood screws.
- Cut the masonite backing board to size and attach to the back of your box, using screws.
- Now for the fun part – start filling the bug hotel with off-cuts of bamboo/cane, wooden blocks and shards of broken clay pots. Do this until the box is filled and fit snugly.
- Add an I-hook on top of the bug hotel so you can hang it in a tree.
Watch the video
Part 2 – Workshop (Ryan)
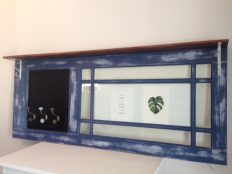
Picture Frame Door
Repurposing a door into a picture frame makes for an excellent statement piece. Choose a door that has some glass panels in its design as you want to display prints or photos in it…
You will need
| Materials | Tools |
| Wooden door | Mitre saw |
| Wooden board | Drill |
| Wood screws | |
| Wood glue | |
| Brackets x2 | |
| Knobs / Hooks | |
| Paint brush & tray | |
| Paint |
Steps:
- Cut a wooden board to the same length as the door, which will be used as a top ledge.
- Prepare the door and ledge for paint by sanding it down and removing any unnecessary hardware (paint stripper may be necessary).
- Either paint or stain the door in a solid colour or distress the wood using an antique method.
- Once dry, secure the ledge to the top of the door using wood glue and screws.
- Mount the right-angled brackets in each top corner to support the ledge against the door-frame.
- Attach various decorative knobs and / or hooks to hang coats, umbrellas, etc.
- Optional: Cut out sections of the door and insert perspex / glass in the recesses to receive pictures.
- Secure to a wall using sturdy hooks or bolt as required based on the overall weight.
Watch the video
Part 3 – Décor (Elle)
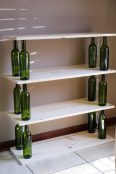
Bottle Bookshelf
Material List:
A bookshelf made from empty glass bottles is not only super easy to build, but also serves as a conversation starter!
| Materials | Tools |
| 12 x Wine bottles | Power drill |
| 12 x hooks | Paint brush |
| 6 x eye strainers | |
| 6 x “S” hooks | |
| 4 x 300 x 700mm pine shelf lengths | |
| 22mm spade bit | |
| Clear sealant / paint of choice |
Steps:
- Take the labels off the 12 wine bottles and make sure that the pairs are all the same height/shape. Wash them thoroughly in hot soapy water. Allow to dry.
- Make a template out of paper or cardboard that is the same size as the shelves; add the evenly spaced placement of the 4 holes in each corner of the shelf on the template in order to place over each shelf to have the exact same drilled holes.
- Place your “drill hole” template over the first shelf and secure. Next insert a 22mm spade drill bit into a drill and place over the template marked holes and drill holes through the wood making use of scrap wood. And drill all holes in the wood shelves.
- Between each of the holes drilled with the spade bit on either side of the shelf, secure a screw hook, first making a small pilot hole and then by twisting the hook securing the hook into the wood. Screw in the cup hooks halfway between the holes on either side. Depending on the height of your bottles, you may need some “S” hooks too to help the strainer reach between the upper and lower hooks.
- Place the bottles over the holes of the lower shelf. Then carefully lower on top the upper shelf, allowing the necks of the bottles to pass through the 22mm holes in the shelf. Allow the shelf to rest on the necks of the bottles. Then by hand adjust the bottoms of the bottles so that they sit flush with the lower shelf.
- Attach the hook and eye strainers and “S” hooks if needed, between the opposing hooks. Tighten up thoroughly.
- To protect the wooden shelves, it is advisable to treat it with a wooden sealant.
Watch the video


