Covering the soil and keeping the nutrients locked is the key to having a healthy garden. Tanya discusses some practical ideas that you can try out to make sure you have a success garden
She then transforms a small rose garden with real bad soil into delightful space by using colourful groundcovers and mulch.
In this DIY slot, Tanya and Garth make decorative garden frames that not make a perfect planting space but also help to make a garden wall appealing
- 3 Different size planting Frames for the wall
What you need:
- X3 Polystyrene boards (50mm thick) 1.2m x 1m
- Tape measure
- Pen
- A straight edge
- ½ bucket cement
- ½ bucket fine river and
- ¼ bucket building stone (13mm)
- Water
- Rubber Mallet
- Sponge
- Tacking screws
- A drill
- A jigsaw
- Rockset
- Thread bar (with plug)
- Terracotta pots (small)
- Hammer (Small)
What to do:
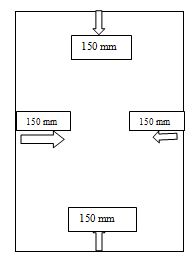
- Measure 150mm from the edge of the polystyrene board to the middle and make a mark with a pencil. Do this for all sides of the polystyrene board.
 [1]
[1] - Use a straight edge to join the dots to create a rectangle to work in.
 [2]
[2] - Repeat step 1 & 2 on the remaining boards.
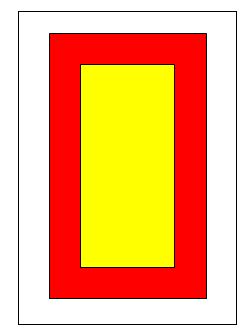
- On each board mark out 100mm from the edge of the working area (red block) on all four sides of the rectangle.
- Frame 1: On the first board, measure the height and width ( 900mm X 600mm) and join the lines to create the second working area
- Use a jigsaw to cut out the new working area (the yellow block)
 [3]
[3] - Frame 2: Repeat steps 5 & 6 with board number 2 by measuring the height and width (700mm X 500mm) and joining the lines to create the second working area
- Frame 3: steps 5 & 6 with board number 3 by measuring the height and width (500mm X 300mm) and joining the lines to create the second working area
- Remove the cut out thickness (indicated red in the illustrated picture) on all three polystyrene moulds.
- Use tacking screws to secure the polystyrene pieces on to the flat plywood surface (this is to make sure they do not move and stay in place)
 [4]
[4] - Mix ½ bucket of cement, ½ bucket river sand and ¼ bucket 13mm building stone with enough water to make a sloppy mixture
- Use a trowel to fill in the 100mm thickness empty space with the freshly mixed concrete. Make sure you get the mix into the corners
- Use a rubber mallet to gently tap the frame mould to get the air bubbles out then finally use a steel trowel to level the top of your frame mould to get a smooth finish. Use a damp sponge to clean off any spillage.
- Repeat steps 11 to 13 for the other 2 frames.
- Leave the moulds to dry for at least 3 days
- When the frames are dry, first remove the tacking screws that were holding the polystyrene pieces down before removing the moulds


To hang the frames to the wall:
- Drill a small hole into the wall. Then mix a little bit of Rockset with water to form a paste. Take a small amount of the paste and put it into the hole in the wall
- Dip the one tip of the thread bar into the Rockset paste and then push the thread bar into the hole on the wall (making sure a portion of it sticks out). Use more Rockset paste to fill in around the thread bar. Leave this to dry for 10 minutes and then you can hang the frame on the thread bar.
- Mark out a spot where you want to attach the planting pot within the frame. Drill a hole on that spot, insert a thread screw plug into the hole – tap it in with a small hammer- until it is level with the wall.Take a terracotta planting pot (make sure it has a drainage hole at the base). Gently drill a hole on the thick outer lip of the pot, make sure the drill is not on hammer mode
- Take a thread screw (that came with the plug that is now in the wall) put it through the hole in the terracotta pot. Then fit the pot into the hole with the plug. Tighten it up with a screwdriver.
- Now you are ready to plant
DIY Video
Viewers Question for the Week