

Cake Decorating
This week on Show me How, we focus on dazzling cake decorations that would be a hit at any gathering. Ray Esmany of Crystal Candy shows us how to make edible lace and fabric and use them to add style to an ordinary cake. Then, finally, we reveal our revamped home studio!
Ray Esmany
Crystal Candy
082 900 9581

Celebration Cake
Requirements
- Crystal Candy’s:
- Lace Signature Blend
- Sillicone Mat
- Ready-made edible lace
- Lustres
- Glycerine
- Warm water
- Paint scraper/spatula
- Kitchen scale
- Electric hand beater
- Cake covered in fondant
- Confectioners glue (CMC + Water)
- Optional: Melted white chocolate
Instructions
Edible Fabric is a new innovation proudly designed and developed by Crystal Candy. The versatility of edible fabric is endless. It can be gathered, cut into shapes, frilled, used for making flowers, bows, napkins, used on figurines for beautiful accents and so much more.
- Making Edible Lace
- Place 20gms of Crystal Lace Signature blend powder, 5 gms of Glycerine and 115gms of warm water into a bowl.
- Beat with an electric beater on high for 5 minutes.
- Dry brush any one of Crystal Candy’s Diamond lustre into your silicone mat. This will create a beautiful shimmery effect.
- Place 2 heaped teaspoons of the mixture onto your silicone lace mat.
- Using your paint scraper/ spatula, work the mixture into the mat with a touch of pressure, ensuring that there are no air bubbles in the design.
- Allow the lace to dry, either in direct sunlight for 30mins, in a 70 degree oven for 10 minutes or in a warm spot overnight.
- Once the lace is dry gently peel away from the mat.
- Your lace strip is flexible and pliable. It can be stored in a ziplock bag and will stay flexible for months.
- Brush a touch of water onto the back of your lace or onto your ready iced cake and stick the lace onto the cake. Lace can be applied to fondant, buttercream, chocolate, biscuits etc.
- Making the bow
- Cut one strip of fabric into 4 sections, see below. Fold over a hem on each of the length sides of all the pieces. Use a scant amount of confectioners’ glue to secure the hems in place.
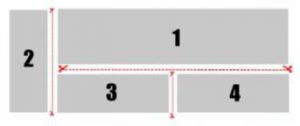
- Cut one strip of fabric into 4 sections, see below. Fold over a hem on each of the length sides of all the pieces. Use a scant amount of confectioners’ glue to secure the hems in place.
- Piece no. 1 – main bow
- With the back of the fabric facing up, paint a thin line of confectioners’ glue in the centre of the strip. Fold the left side into the middle, paint another thin strip of glue over the edge of that fold and fold in the right side.
- Now gather the centre to create a bow. Use a peg to hold it in place while the glue dries.
- Piece no. 2 – centre ribbon
- Fold this piece lengthwise in half to make it narrower and thicker. Wrap around the centre of the bow twice, and cut off any excess. Glue at the back. Use a peg to hold it in place while the glue dries.
- Piece no. 3 & 4 – the tails of the bows
- Cut a ‘V’ shape into the bottom of each piece.
- Gather the top of both pieces to create the 2 tails and stick to the back of the bow with confectioners’ glue or chocolate.
- Finish the cake off by wrapping a piece of fabric around the cake and stick the fabric bow onto the front if the cake. Use melted white chocolate for a stronger and quicker result. Place an edible flower onto the top of the cake and sprinkle some edible diamonds over the cake.

PDF Download

